Showing posts with label Shirts. Show all posts

Friday, March 8, 2013

Wrinkles on a Shirt by bi_bi_love

This continues on from the Basic Shirt Tutorial.
Step 1 check your settings….
Hopefully the brushes tab will be open in your “Layers, etc.” box, if not you can open the brushes in their own box by using ctrl+shift+B


Step 2 Open your xcf file saved at the end of the Basic Shirt Tutorial and add a new layer and rename it “wrinkles” (double click on the name next to the image in the “Layers, etc.” box.) At this stage I would “Save As…” and give it a new name, I changed mine from UFUT_bbl_yellow_tutorial.xcf to UFUT_bbl_yellow_tut_wrink.xcf
Once saved select the Paths tool.


Step 3 Reduce the opacity on your shirt layers to around 10-15% and select the new layer (hide and unhide it to make sure you have the right one, nothing should happen).


{Waffle alert}Take a moment to note how the lines of the mesh line up. Imagine folding the mesh in 1/2 across the shoulders, if you count up where the white lines intersect the green, you can line up across the front and by counting the same number on the back area you can line up back to front. I have placed orange dots on to give an idea; you should see more through this tut. Remember the female mesh includes short sleeves in the torso area, after 6 lines up from the waist you are moving onto the sleeve area. You will get more idea of this through this tutorial. {End of waffle alert}

Step 4 Zoom in to 200% as we are going to work in fine detail (You might note that I have reduced the opacity on my alignment spots). Where you start is up to you and practise and experience will determine this, for this tutorial I am starting at the 2nd intersection up on the left.
Carefully place the 1st point of the path as centrally on this as you can, then add a point outside of the shirt outline (these should connect automatically). Click on the point on the intersection to activate it again, then make a new point just inside the mesh, about 15 pixels in (Step 5 will clarify the reason for this). Decide how long you want this wrinkle to be across the front and make your final point.


Step 5 Now you want to give the wrinkle a lil shape, this is done by dragging the paths between the points. The only path you want to shape is the between points 3 and 4. As you pull the path out you will see a box appear from each point that is attached to it by a dotted line. You can click on these boxes and drag them to form your shape. You want the path to feed into point 3 as smoothly as possible, to best get this, drag the box from it so it is on a horizontal line between points 3 and 4. The box from point 4 you can drag to suit.
WARNING – if you click on any other functions before you have finished setting your paths, they will disappear and you will have to start again (yes, I lost them a few times preparing screenshots ).


Step 6 Here is where things become a lil tricky. Move up the mesh outline about 10-15 pixels (you can measure this by reading the y axis counter in the bottom left, but note how many you do move it by!). Then repeat the process. Before placing your 1st point in the 2nd (and other paths) note the cursor, it should have a double edged square next to it. If it has a plus it will add to the last point. After curving a path the next point is usually a new path, to force it, just press and hold shift.


I did 3 paths, then repeated on the right and on the back (top of the mesh).


Step 8 Stroke to path. With the paths tool selected, in the Toolbox you will have the option to “Select from path” or “Stroke to path”. Choose the bottom one, Stroke and you will get a dialog box.
Check “Stroke with Paint Tool” and from the dropdown list, choose Paintbrush. Also check the “Emulate brush dynamics” box.
At this point you want to check the dynamics…DO NOT click on the paintbrush or any other tool or you will lose all your paths. In the “Layers etc” box select the brushes tab (if not active) then select circle 3 (5x5), the 2nd smallest. Also make your foreground colour black.
Finally click “Stroke”


Thin black lines should appear under your paths.


Step 9 if you aren’t zoomed in, zoom back in to 200%. Carefully go to the point 4 on each path (the one nearest the middle) and move the point up (towards the neck) a little bit and tweak so that the black lines you have just stroked are not covered. One thing I do is take the box from point 3 and move it up so it is on the black line I have just stroked, but play with it and find what works best for you.
Now change the foreground to white and “Stroke to path” again.


If you find too much of the black is covered, remember ctrl+z, tweak a lil more and try again.

Step 10 Bring your shirt layer up to 100% opacity again. Then apply a Gaussian blur of 5 to the wrinkles layer.

Step 11 The wrinkles I have done are one the sides but for loose tops the will be elsewhere. Study how people’s clothes hang and apply the same principles to different areas of the top.


Depending on what colour your shirt is, reduce the opacity of the wrinkle layer, again this is practice and personal preference.


Step 11 Housekeeping, go to your shirt layer and use “Alpha to selection”, press ctrl+I (this reverses the selection). Go to your wrinkle layer and press delete. All this does is satisfy my OCD and makes sure that no wrinkle lines overlap the edge of the shirt, so you can well miss this step.

Step 12 Upload and test. I did a teal version before writing this tut, as you can see it was more effective on the darker colour. I’ll leave you to enjoy and play around.


Basic Shirt Tutorial by bi_bi_love

Assumptions
For all of my tutorials I make the following assumptions
- You have downloaded and installed the GIMP
- You have downloaded and saved the meshes (UVMaps). They can be found by clicking the Clothing tab on your profile and using the “Designer Kit (Download)”.
Click for - DIRECT DOWNLOAD LINK to Designer Kit 

-You have at least a basic an understanding of how textures work in both creation, storage and use in world (I may do a tutorial on some of this in due course).

- You have an idea of how to use GIMP, or at least have a handy page bookmarked that you can open alongside this.

- You have worked through the Preamble post

Step one: Open up

With your torso mesh open….save your image. This early? Yes. File – Save As…
And give it a distinct name I have saved mine as UFUT_bbl_yellow_tutorial.xcf. As you can see I use the naming convention mentioned and linked to toward the end of the Preamble from my 1st save.
Now I can save and save and not worry about messing up my basic mesh. (you’ve got to love experience!)


Step two: Create a new layer


Using the free select lasso tool select the torso area, not including the arms (on the left) or collar strip (top right).


You want to have an overlap for the textures in order to avoid those ugly seam lines that are in so many of the textures in customize.


{Updated} I use the lasso tool and follow the mesh lines exactly, then use Select - Grow. You get a pop-up box to define the growth, I usually set this to about 15 pixels{/update}

Step Three: Select the Colour you wish to work with


Fill in the area you selected with that colour, you can use the paint brush for this or the bucket fill, the bucket fill is quicker and you don't need to worry about missing any areas.

Having read Xaoz’s tutorial (no longer available), I have never used the paint brush tool for any sort of block colouring.


{update}You can simply drag the colour across to the selected area to fill it{/updae}

Step Four: Lowering Opacity
Lower the Opacity of the layer you are working on so that you can see the mesh through the colour.
Xaoz said he usually uses 50% for this part, me I’m lazy and just slide it down to get the level I need


Step Five: Neck

Using the Ellipse Select Tool (see pic above) select the area you wish to remove for the collar, it must include all of the neck opening, the closer to the opening the smaller the collar.
For a touch of editorial license… Xaoz use’s an ellipse that is longer in the front because he’s a guy and likes to see a woman show off her cleavage! I use one longer at the front because I like to see cleavage, both my own and others.
As you develop your skills shapes and preferences will change to suit you and the outfits you design.
This is one of the reasons you lowered the Opacity so that you could get an idea of how the neckline would look.

Step Six: Erase or delete the selected Collar area.


In GIMP this should be as simple as pressing the delete key. Ctrl+X cuts it out, to the same effect.
"It won’t delete!! Why??" I’ve often had this and 95% of the time it is because the wrong layer is selected.

Step Seven: Finish GIMP file
Raise the Opacity of the Working Layer to 100% and save the file. We have already saved it as a GIMP file and with a working title. This preserves your layers.
(Xaoz saved his as Tutorial01 for his working file name because This was his first Textures Tutorial. If this is your first creation you may want to name it shirt01 or blouse01).

As I mentioned in the Preamble, it is worthwhile taking time to think out a naming convention for yourself. At this stage I have over 1500 {updated from Mar-10 when it was 400} completed items, that is 1500 GIMP files, 1500 image files, add to that part projects and sample files etc, etc. And I am not hugely fast at turning out outfits...update that to bleedin' slow!.

Step Eight: Prepare to wear
Hide the Background or mesh layer.


It is so simple to hide layers. On the layer panel click the eye icon next to the layer you want to hide. (To get it back click the same spot.)

Step Nine: Lastly
Save the file as a png file using the naming conventions you learnt by following the link in the Preamble.


I use that convention for saving my GIMP files from the start of a new texture, so all I need do is open the Save As…
Then scroll down the file type list and select the PNG Image line.

Finally click save.
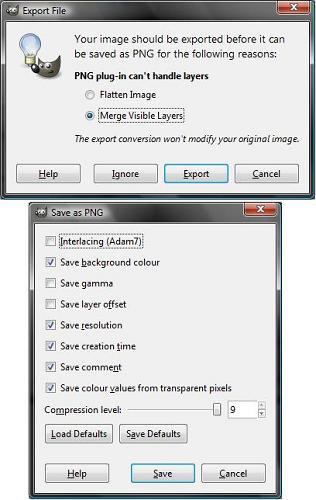
You will get the following 2 boxes:


Make your selections as shown and click Export then Save respectively.
UFUT - Designates the textures as a ClothingTorso Item wearable by VIP Members only.
bbl - My Designers Mark use the initials of your avatar or something else that will be unique for you.
yellow_tutorial – a very brief identifying description.
.png - the file type
So once finished...I have 2 files, 1 GIMP with the xcf extension and 1 png
UFUT_bbl_yellow_tutorial.xcf
UFUT_bbl_yellow_tutorial.png

You have 2 options for getting your designs in world.

1) You can use Utherverse's distribution system, UVCloset, which is accessible via the "Clothing" tab on your home page

Rand has done 4 video tutorials on how to use it - UVCloset Video Tutorials compliments of RaD Fashions


2) UVDeviant - www.uvdeviant.com, you will need to open a separate account with them and presumably there are full instructions on how to use this on their site.

Credit where it's due
Although mainly identical to Xaoz’s tutorial (no longer available), hopefully this will help anyone struggling with GIMP.
All credit must go to Xaoz for 2 reasons, 1) I have only adapted his tutorial, 2) without Xaoz's tutorial I probably wouldn't have got started designing.

GIMP - BASIC SHIRT TUTORIAL Video by bi_bi_love